Sunday, June 10, 2012

750 Fan Celebration WINNERS!

Thank you for joining in the fun of celebrating our most recent goal of reaching 750 fans on Facebook. And now to announce the winners.

The winner of the Nifty Nappy Snappy SwimzEaze is Rebecca Forster!

The winner of the Set of Cloth Wipes x12 is Leah Corsover!

The winner of the Set of 2 Bandanna Drool Bibs is Ghada Shereif!

And the 2 winners of the 50% off Coupon Codes are Kayleigh Anne Sheehy and Hannah Craven Natour!

Congrats to all our winners! More prizes to be given away when we reach 1000 Facebook fans! Thanks everyone for being such great fans!

Sunday, June 3, 2012

750 Facebook Fan Celebration!

In honor of reaching our most recent goal of 750 fans on Facebook we are having a super awesome giveaway! 5 Prizes are up for grabs including a Nifty Nappy swim diaper and x2 50% off coupon codes for my etsy shop! There are several ways to get entries and you can tweet daily for an extra entry. Make sure you read everything before entering and take special notice that all shipping costs will be paid by the winner. International fans welcome!! There are separate widgets for each prize so you can enter one or enter them all, please keep in mind you can only win one prize. I will automatically redraw if a winner is drawn for a second prize (you will not have a choice of prize). a Rafflecopter giveaway a Rafflecopter giveaway a Rafflecopter giveaway a Rafflecopter giveaway Thank you and GOOD LUCK!

Thursday, September 1, 2011

"How to Sew Like a Crazy Lady": Lesson 3 (Irononables & Fusibilistic Tendancies)

Lesson 3! OH MY! *pats self on back, then rewards self with LARGE spoonful of Nutella for keeping it up (and yes I am day late this week, shush)*

This week we are going to discuss a few of those items that are sometimes used in sewing that you have to iron-on to or fuse to fabrics... there are lots of different products that do this but we will just talk about the ones that I specifically use, because that's all I care know about.

First out of the gate is the magically fantastical stuff I use when I make my appliques. It is an iron-on adhesive, I use Heatn'Bond (which will be referred to as HnB from now on) brand, there is also Wonder Under and probably others I don't know the names of. They are work the same though. They are gluey on one side and paper on the other, you will adhere the gluey side to your fabric then peel off the paper to find another gluey side that you can adhere to other fabric. I find it's best to cut my shape (tie, letter, whatever you might want) out of the HnB first, I trace a print out onto the paper side of the HnB and then cut it out, like so...

Make sure if you are cutting out a letter or number that you do it backwards... just stop and think first otherwise you will end up with this... It's supposed to be a 1, ooops! (awesome fabric placement too, I was SO mad)

Once I have my HnB cut into my shape I get out my trusty iron, set it to whatever the adhesive packaging tells me (you REALLY don't want to go too hot because it will not work and things will get ruined and you will hulk smash something, for certain) and I find the perfect placement on the WRONG side of my fabric and iron that bad boy on. STOP! DON'T REMOVE THE PAPER BACKING YET! RESIST THE URGE! I know you want to, but it will make cutting it out more annoying, so just cut it out and then you can remove it.

Now that you have you adorable shape cut out in your fabric you can iron it to whatever you want. Again make sure it's not to hot because it will just melt the glue through the applique and it won't stick to the item. And it will smell burny.

I finish all my appliques on the machine after they cool, but we aren't doing a tutorial for that, we are just talking about HnB and how it works/how to use it. This is the only thing I use HnB for, not sure if it actually has any other applications.

Another iron-on-y item I use is interfacing, it comes in all sorts of thickness/weights and you use them for different things. I use a lightweight interfacing for just a little bit of stiffness/structure/extra durability. It just gives a little extra help to your item. I also always put it on the back of hand embroidered items to keep the stitches in their place (especially for things that will be exposed on the backside so that busy fingers don't ruin all my hard work).
I use a heavy weight interfacing for things that need to be more structurally sound, like bags/totes that you want to keep their shape.
Then there is fusible fleece, I like it because it's squishy like batting but it irons on and gives stability like interfacing. BRILLIANT. Now you can HUG YOUR PURSE! *SNUGGLES*
Interfacings also have all their own temperatures for adhering them to fabric, sometimes they want you to use a damp cloth between the iron and the fusible, I just use my steam setting (this MIGHT be wrong, but it works, so I keep doing it, I am sooo bad). You will always want to apply these to the WRONG side of your fabric, unless you want to use the wrong side as the right side and well, then you might just be crazier than I am. Sewing through interfaced fabrics can be tricky (ESPECIALLY with the fusible fleece because it's so puffy), but just keep elbowing it and it will go through, lol. Yes, my approach to sewing is brute force. IT GETS THE JOB DONE! (Though often time results in lots of punching and profanity).
This is the back of a piece of fabric that has a light interfacing on it...

This is a piece of medium to heavy weight interfacing (all crumbled and wrinkled from being in the bottom of a drawer)...

This is a squishy piece of cloud... I mean fusible fleece, you may or may not be able to see the little tiny bumpy glue dots on the backside (on the left), but they are there...

I haven't decided what to do for next week's blog so be sure to let me know if you have something you would like to hear me ramble about.

Wednesday, August 17, 2011

"How To Sew Like a Crazy Lady": Lesson 2 (Your Fly Is Down... or... XYZ, eXamine Your Zipper!)

Honestly, I am surprised you came back for more... You sure do like your crazy! We like you too... *wink*

This week we are going to talk about that Z word, the one that gets you everytime... no, not Zombie, not Zydeco, and no not Zachary Levi (though that's a good guess, mmmmmmmmmm Chuck)... we are here to talk about ZIPPERS! *booooo* *hiss* I know, you all HATE sewing zippers, it's SOOOOOOO hard. I am going to let you in on a secret. It's not hard, it's so easy you are going to want to punch me for not telling you sooner.
True Story.

I sew a LOT of zippers, I make loads of zipper pouches because it's a great way to use up scraps, they are super handy, and they are quick and easy! I tend to accumulate lots of zippers from thrift stores, family members, and swapping so I usually end up with lots of random sizes of zippers. Now what do you do when you are making a tiny coin sized zipper pouch, but the only zipper you have is 20in too long... you cut it! VOILA! Now you have a short zipper, yep, you can cut zippers. Some people will stitch a quick zigzag at the end so you don't unintentionally unzip the zipper pull off the end, but I am (lazy) just careful or at least I try to be (and then when it inevitably happens I curse, throw something and move on about my business).

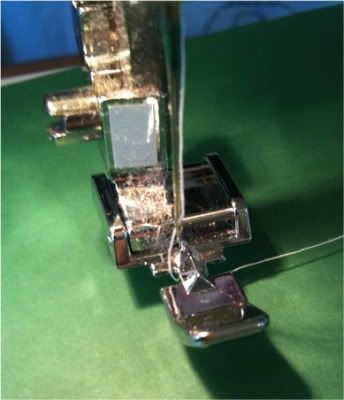
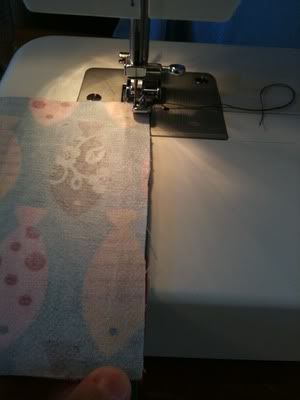
The ZIPPER FOOT! I love my zipper foot, one came with my cheapo Singer sewing machine so chances are, you already have one. Mine looks like this...

You make sure it's on the other side of your zipper... like so...

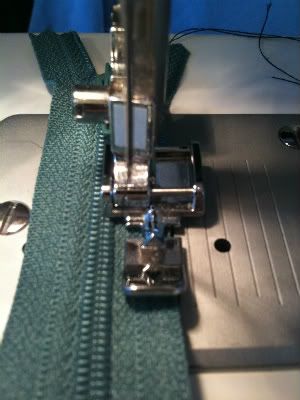
And it works like a charm. Also handy for sewing piping or other snug spots.

This is my zipper pouch sewing shortcut, it's GENIUS and saves me loads of time (probably not really loads, but I like to think it saves me time and thread and therefore money...), it's totally top secret so don't go telling everyone, like posting it on the internet or something.

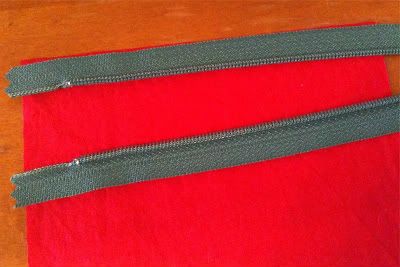
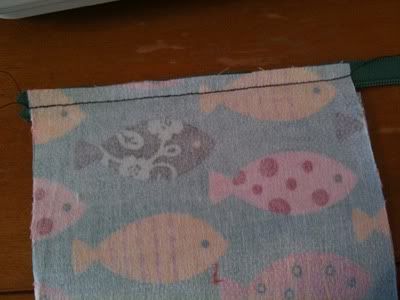
First, unzip your zipper. WOAH! Put your pants back on. Unzip the zipper that you will be using for your zipper pouch! Now lay your lining fabric (right side up on the table and put your zipper, right side up, on top with the tops lined up, like so...

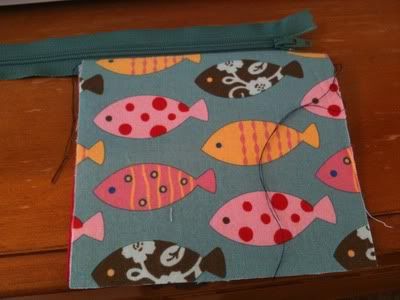
Now place your outer fabric on top, wrong side up, make sure everything is all lined up... seeee...

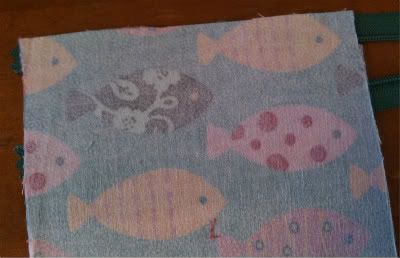
Look it's a zipper sandwich! *nom*


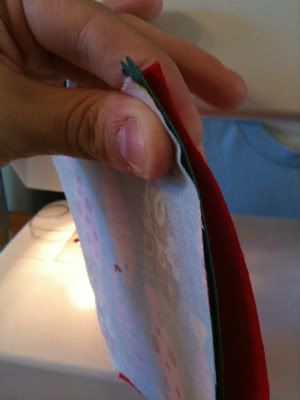
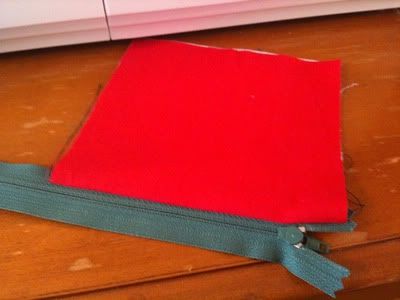
Now we are going to sew it, all stacked up like so, it's going to be awesome, I promise! I like to line up the edge of the fabric with the edge(ish) of the other side of the middle thingy (yes, that's the technical term) on the zipper foot. And GO!

Keep going, you can do it!
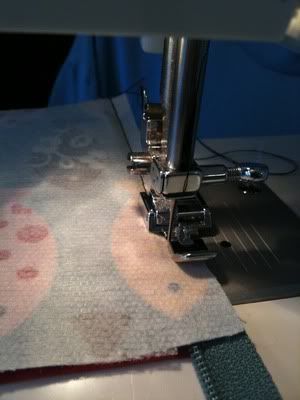
YAY!!!!! Good job!


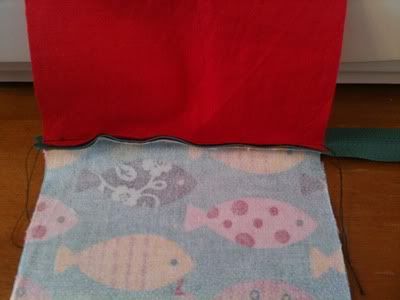
Now turn it right side out and admire...

And the lining side...

See, how nicely the edges are hidden in between...

To proceed with the pouch you do the same thing on the other side of the zipper and then finish sewing it up however you would normally do so (there are tons of tutorials out there, I don't plan on posting my own since it's just like all the others).

You can apply this method to just about any zipper project, just line up the edges and sew it! Obviously this won't work for fancy invisible zippers, but I don't have much use for them so we won't even talk about that.

Now I know what you are thinking... what the heck am I going to do with this HUGE pile of ends that I cut off all those long a$$ zippers. This is something I have been trying to figure out for a while... there are lots of projects that roll zippers up until flower brooches and things of that nature. I am thinking though I will start using them for straps (like on wristlets or key rings/fobs...) or if you don't have terrible trash guilt (like me), toss them.

Other uses for zippers, TOYS! You're trying to sew and your toddler won't leave you alone, hand them a zipper. You're trying to sew and your 5 year old won't leave you along, hand them a zipper. Now you have 2 children playing with zippers, leaving you alone, until they start fighting over them because the toddler wants 2 zippers, more specifically, the 5 year olds zipper... oh... fun stuff.

Alright, that's really enough rambling from this crazy lady... so I hope you have enojyed your stay and join us next week when we will pretend to know what we are talking about when discussing iron-ons/fusibles. I just love ironing stuff onto other stuff when I sew.

"How To Sew Like a Crazy Lady": Lesson 1 (How to tip with paper... *wait, what?*)

This isn't going to be a "How to Get Started Sewing 101" kind of thing, my brain doesn't work from start to finish, I start at 4, jump to 7, back down to 2 and then things just get weird. So at times, this may be hard to follow. Some things may be very basic and you could teach your kindergartner how to do them (Hey, I have one of those too!!) but somethings may be more advanced and might not make a bit of sense to you (sometimes they don't make sense to me either).

I have been thinking for a few days about what I might like to start with and I decided to start off with a few tips about paper... I know what you are thinking, WTH does paper have to do with sewing?!?... Well, you will see.

1. You don't need to spend money on fancy pattern paper, there are lots of cheaper alternatives out there. First off tissue paper, like the kind you wrap presents with that you can get like 20 sheets for a buck at the dollar store, works great (white, red, polka dot, doesn't matter, if you are using colored though be careful not to get it wet since sometimes they do bleed and you don't want them staining your fabric). Another great alternative is paper grocery bags, they are nice and thick so you don't have to worry about accidentally tearing it when you inevitably sit on it or your baby tries to DESTROY (it happens, more than you would think). My personal favorite paper to use though is the paper they put between the pieces when you buy furniture from IKEA, yes, you read that right. If you are like me, ALL of your furniture if from IKEA. And if you are cloth diaper using, composting, recycle-aholics like we are, you don't just throw that paper away, you hoard it, rolled up nicely in the corner for all of eternity. Well, BUST OUT THAT PAPER, because for serious, it is the best paper I have found to use for patterns, it's in big sheets and it's just the right thickness (not so thin it shreds when you look at it, but not so thick you can see through it to trace).

2. Speaking of tissue paper... if you ever sew with a sticky material, like vinyl or PUL you know that it gets hella annoying because it sticks to the presser foot and will drive you MAD (curse profusely, threaten to throw your sewing machine off the deck and then storm out of the room mad). You could spend some $$ on a teflon presser foot OR you can save that money and spend it on fabric (mmmmmm FABRIC *drools*) and instead get out a sheet of tissue paper, roll it up and then cut 1 inch strips and then you just lay those handy little strips on top your sticky fabric (where your seams will be) and VIOLA! they slide right through, all beautifully sewn. BRILLIANT, I know.

3. Paper Templates! I love making templates, I am a nerd like that. I make them for everything. When I make my wipes I have an 8x8 square of cardstock that I bust out and use for cutting my squares. I like using a heavier weight cardstock because it's more rigid than just a sheet of paper and I have an F*TON of it in my stash from that time when I thought "Oh Hey, I am going to be awesome and make cards". Cereal/mac-n-chees boxes, shipping boxes, all kinds of boxes and heavier weight papers work great. I also use templates for my basic applique shapes (like the ties). What's really handy about the cardstock templates for appliques is that you can print right on the cardstock and then it makes it a lot easier to cut out. Around here, easier = better.

Next time I *might* actually draft up a plan for my post and then when I get this far I won't just be like "Ummmm, derrrr, I can't think of anything else". So I guess that means this is the end of the road... for Lesson 1.

If you are having trouble with something in the sewing room or are wondering how a crazy lady would do something, let me know and maybe we can address it in the future!
Tune in next week for... FUN WITH ZIPPERS!


You may have noticed a trend of reusing materials, recyclables and such. Yes, we do love our Mother Earth and all that good stuff, but often times my usage of "materials on hand" comes from a desire to not want to have to get dressed in real people clothes and go buy the proper materials. I make due, a lot, and it works for me.

Reviving the Shop Blog!

Starting today... the BLOG IS BACK! YAY!
To start get the party started, every Wednesday I will be posting a sewing tip here. This new segment will be called "How To Sew Like a Crazy Lady!"
As you may or may not know I have taught myself how to sew, I started sewing back in 2003 but didn't REALLY get into it (and get my own machine) until 2005. We picked up a cheap-o Singer at a Black Friday sale and I never looked back. I still use that very machine quite a bit, it could really use a tune up. For what we paid it has been a great little machine, a real workhorse, it's not even complained when I've tried to sew Naugahyde with it. I have since gotten a fancier new machine (all computer-tastic and such), as well as a serger, and along the way I have had to teach myself how to do use them. The series is called "How to Sew Like a Crazy Lady" because that's just what it is. I don't claim to be a sewing expert, I would like to think that I sew well though and neatly and I make sure everything I sew (and sell) are of the utmost quality. However I don't necessarily do things the most efficient or practical way, I do things the way that works best for me... and well, let's face it, I am a crazy lady. Many times during my life I learned to do things backwards, I like to get the hard thing out of the way before learning the easy thing. So... get ready to learn all the magic secrets of how I have learned to sew over the past 6 years, it should at least be entertaining.

Wednesday, August 27, 2008

A Family, A Fair Recap!


A Family, A Fair was a lot of fun! A lot of good friends came out to support and it was great to see them all, even if I was stuck behind a table the whole time! Lots of thanks to my bestgalpal, Aimee (I know, Amy & Aimee, how silly is that), who helped out TONS, seriously, she made my day much less stressful (especially after not getting any sleep and not feeling so well).

Here are a couple shots of my table/garment rack setup...


The outfit I donated to the silent auction. Skirt with matching appliqued onesie and matching headband (size 6 months).


A couple of the other matching sets I made, skirts and shorts with matching appliqued onesies.


I still haven't managed to get all the new items from the fair listed in my etsy shop, I have been super busy, trying to get my house back to a state of clean (it was neglected while I was sewing like a madwoman to get ready for the fair), and my little guy has just started a gymnastics class and will be having a 3rd birthday party (Thomas themed of course) in 3 weeks. Busybusybusy. But keep an eye on the shop because I have a bunch of cute little skirts and shorts to get listed.

And now for some exciting future fair news, I applied to the Handmade Market today (it's November 8th, so still a ways away). I am really excited about it, so keep your fingers crossed that I get accepted.